Feeds:
Posts
Comments

3-2-1, Pickles!

IMG_0167

I have raved about the incredibly talented, (and crazy stylish!) chef Marcus Samuelsson here before, and this months’ recipe is yet another amazing staple I’ve learned from one of his wonderful cookbooks. This streamlined pickling process is such a cinch, you won’t ever need to look back at this recipe after you’ve pickled your first batch. I actually made these bad boys at the end of the winter, when I wasn’t able to get through all the vegetables that my kick-ass winter CSA bestowed upon me. This was a great way to make sure my kohlrabies, beets, daikon radishes, and carrots didn’t go to waste before I had a chance to use them.

But. In all honesty, I think spring & summer is the best time to get your pickle on: picnics, BBQ’s, beach days… Burgers, seafood sammys, charcuterie boards, (oh my!)… They’re all screaming for some sweet & tangy garnishes. Happy pickling!

IMG_5759

(Adapted from Aquavit, by chef Marcus Samuelsson)

For the pickling liquid:

3 c boiling water

2 c white vinegar

1 c sugar

Liberal pinches of the following: kosher salt, turmeric, assorted peppercorns coriander seeds, (toasted and crushed)

A few cardamom pods, (toasted & crushed)

A few cloves

A few juniper berries

2 bay leafs

1 shallot, sliced thin

fresh parsley

IMG_3706IMG_5750

* You do not have to have EVERY item on this list to make pickles! Just go with what’cha got!

To Pickle:

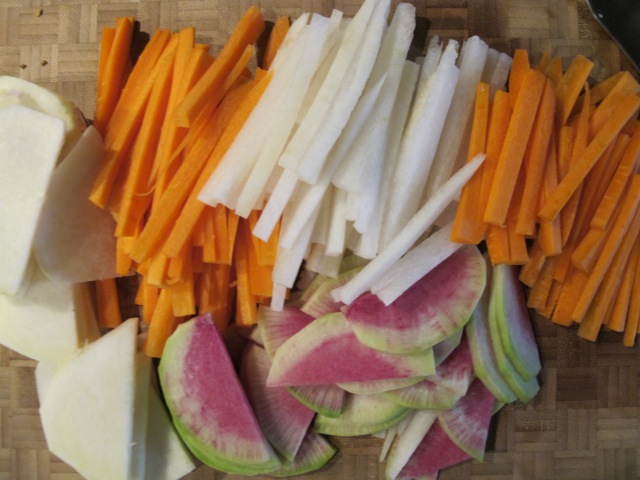
3 beets, peeled, rinsed, & cut into wedges/sticks/slices

2 kohlrabies, peeled, rinsed, & cut into wedges/sticks/slices

1 small daikon radish, peeled, rinsed, & cut into wedges/sticks/slices

3 carrots, peeled, rinsed, & cut into wedges/sticks/slices

*Pickle whatever you want! Doesn’t need to be these items…

IMG_5752

In a medium bowl, combine the boiling water, vinegar & sugar. Whisk so sugar dissolves. Allow mix to cool a bit. Then, stir in the remaining ‘pickling liquid’ ingredients.

IMG_5758

Arrange soon-to-be-pickled veggies in jars and pour the liquid in over them. You can enjoy the pickles as soon as the following day—or wait a few days for a stronger pickle. They’ll keep for about 2 weeks.

Danielle Hot Dog GoogaMooga

Make yourself a killer sammy, garnish with homemade pickles, and take that sucker OUTSIDE! Happy season of eating outdoors!

The incredibly talented, (and crazy stylish!) chef Marcus Samuelsson:

IMG_4310


From Dish Erin:

DSC_0223

Because turmeric is underused in American cuisine, is such a bold flavor, and has the potential to temporarily stain your hands and dishes (don’t worry, it’s nothing a good scrubbing and soaking can’t fix), many people can be hesitant of cooking with it. But it’s really nothing to be scared of. This is an alternative to traditional stir fry that is perfect for a turmeric newbie. It’s also a super quick weeknight meal.

Oh, and just in case you needed another reason to try it: Turmeric is kind of a magical spice. It’s linked to lower rates of Alzheimer’s disease, and is thought to aid in preventing certain types of cancers. Tests have also shown that turmeric is an anti-inflammatory, which helps to reduce and treat arthritis, psoriasis, and even may lower cholesterol.

DSC_0203

1-2 tablespoons peanut or canola oil

2 boneless skinless chicken breasts or thighs, sliced into 1 inch pieces

1 yellow onion, sliced thin

2 garlic cloves, minced

Shake or two of cayenne pepper

1 heaping tablespoon (or 2) of turmeric

1/2 inch fresh ginger, grated (or you can use 1 teaspoon dried ginger)

2 tablespoons butter

2 tablespoons soy sauce

1/2 cup of chicken stock

1 head of broccolini or broccoli florets

1 cup of mushrooms, sliced thin

Heat oil in a wok or sauté pan. When hot add the chicken and cook for a few minutes until the pink fades.

DSC_0206

Add the onion and garlic, stir or shake the pan to coat everything in the oil and cook for a few minutes until the onions are translucent. Make a well in the center and add the ginger.

Add the cayenne and turmeric, and again stir to coat everything in the spices.  The pan will immediately turn an amazing, bright yellow color.

Stir again to coat then add the soy sauce, butter, and chicken stock. Then add the broccoli and mushrooms and allow everything to simmer for just shy of 5 minutes.

Serve over rice.

DSC_0218

This month we are focusing on the spice turmeric!  Here is a new one from Dish Deanna:
finished

Turmeric is typically used in a lot of curries, can be used as a substitute for saffron and apparently has great health benefits. It is very vibrant, adding color to any bland-looking recipe and it even has anti-inflammatory properties, helps detoxify the liver, and is a natural pain killer. As I was doing research about this interesting spice, I was reading that many people put it into capsules and ingest it daily. This might be something worth looking into further! I do have to say though, when I heard that Turmeric was the theme of the month I panicked a little. I had no idea what kind of recipe to make. I knew that it is used in many curry recipes but I wanted to do something different. As I was browsing some vegetarian recipes, I came across one for hummus. It didn’t have turmeric in it but I improvised a little and came up with something that I think is pretty damn creative.

Ingredients for the hummus:

  • 2 (15 oz) cans of chickpeas (or garbanzo beans)
  • 3 or 4 garlic cloves
  • 1 tbsp turmeric powder
  • 1 tsp curry powder
  • 1 tsp salt
  • ½ cup olive oil

Ingredients for the pita chips:

  • 1 pkg of pita pockets
  • Garlic powder
  • 3 tablespoons olive oil

You will need:

  • A food processor or blender!
  • An oven or toaster oven

chickpeas

To start, strain the chickpeas and rinse them with water. This will take off any liquids that are still clinging to the chickpeas from the cans.

turmeric

Measure out all of your ingredients and toss everything into the food processor. Pulse until the mixture is smooth. You may want to open the food processer intermittently and see how your hummus tastes. I found as I was making this that it was very experimental. In order to get the creamy texture I wanted I had to add just a little bit more olive oil. Feel free to be liberal with your measurements – you can’t really mess this up!

blender

After you’ve finished with your hummus, place it into a bowl. I prefer my hummus at room temperature but if you like it cooler, throw it in the fridge! To start on the pita chips, first preheat your oven or toaster oven to 350 degrees. Cut one pita pocket into 4 even triangles and peel apart each side. Lay them flat on tin foil on a baking sheet. You should then brush one side only with olive oil, and sprinkle garlic powder and salt over the pita. Toss them in the oven for approximately 5 minutes (maybe even less). I wouldn’t walk away from the oven because you want to take them out as soon as the edges turn golden brown. I burned the first batch!

chips

When they look about ready, take them out and let them cool. Then get ready to enjoy. You’ve just made homemade hummus and homemade pita chips! CONGRATS!!

*** serve with veggies or save for later to use as a spread for sandwiches!***

me